Friday, April 24, 2009
Wood Thursh and Other Sightings
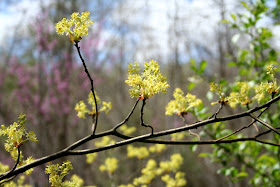
Sassafras Tree in Bloom (April 20, 2009)
He was there--a Blue-Gray Gnatcatcher, a tiny bird who I see every spring. Had I had my camera handy, I would have gotten a great shot. Oh well--I will just enjoy the lovely colors of the Sassafras blossoms to cherish the memory.
Wood Thrush (April 22, 2009)
On Earth Day morning, I saw my first Wood Thrush, under the feeders acting a whole lot like a Robin--what a reminder to appreciate the wonders of the good earth. This morning I heard his wonderful song for the first time.
Garlic Mustard
Another sighting was not welcome at all--garlic mustard. I thought I had rid my yard of this troublesome invasive two years ago. I pulled up some last year and thought I was done with it. Evidently, I missed a few because there were small stands along the edge of our yard and into the woods. So, I have been pulling them up by the roots. Now is the best time to get rid of them because the ground is moist and the white flowers are easily seen.
The seed pods of the Garlic Mustard will pop out hundreds of seeds from a single plant. That's why I was determined to pull out every plant I could find. I also learned not to put them in the compost pile or let them lay on the ground--they can still do their dirty work. So, I have a 5-gallon bucket full of the plants in my shed--I will let them dry out and maybe put them on one of our bonfires later this year if we can stand the garlic smell.
Last Sunday, I put up my hummingbird feeder and within an hour, I saw a hummer at the feeder. I usually wait until the Columbine blooms but this year it is very late, perhaps because of the cool weather.
Spring is racing along....
Monday, April 20, 2009
Phlox, Wood Anemone and Pear Blossoms with Bee Update
Blue Phlox (Phlox divaricata) April 17, 2009
Blue Phlox is blooming profusely along the road where the highway department trimmed the brush. Hooray--wish they would do this every year instead of spraying pesticides. Native wildflowers tend to take over and it is also better for my honey bees which are on my mind a lot lately (see below for update on my hive).
Wood Anemone (Anemone quinquefolia) April 17, 2009
Bloodroot and Toothwort flowers are just about gone as the mid spring flowers take over. I spotted this Wood Anemone in the woods. You can see that the forest floor is still very brown with the exception of alien invasive species (i.e. multi-flora rose, Japanese barberry, Japanese honeysuckle) which get a head start by leafing out early. That also makes it a good time of year to remove these troublesome species.
Sweet Cherry Blossoms and Honey Bee (April 9, 2009)
With bees on my mind, I have observed where my bees forage. I have watched them go from the hive to the dandelions and henbit I have allowed to grow up in our lawn this year. I also see my honey bees follow along the powerline to these sweet cherry trees that must have been planted a long time ago by the farmer who owned this land.
Old Pear Orchard (April 12, 2009)
On the back part of our land and next to our neighbor's beautiful barn is an old pear orchard where I went to see if the trees were blooming and to search for honey bees. I have been trying to restore this orchard for several years by pruning the many branches (per a Mother Earth magazine article).
I wondered what happened to the fruit every year since I do not harvest the many small, mostly inedible pears. Last year, I was looking at the pears on the ground when a cow approached. I threw a pear at her to shoo her away. She promptly ate it and came over with her calf and gobbled up a lot of pears--another mystery solved.
Pear Tree Blossoms (April 12, 2009)
I don't know if the honey bee on the right is from my hive but there were several on this pear tree along with bumble bees and many small bees.
The weather has not been good for bees since I installed my package April 3. There have been few warm, sunny days. The bees don't go out to forage on the mostly cold, rainy days we have had. So, it is good thing I have fed them sugar syrup continuously.
Update on my Bee Hive
With some good advice from fellow beekeepers, I requeened my hive yesterday (the eggs in the previous post were probably from laying workers). I also used an ingenious method for removing the laying workers as recommended in the Beekeeping for Dummies book and further detailed by another beekeeper who did this last year. Hopefully, these efforts will rejuvenate my struggling hive.
Friday, April 17, 2009
Hive Inspection
These photos were taken late this morning during a hive inspection. Details and particulars are at the end of this post.
4th Frame
Here you can see the cells with pollen and sugar and the two capped cells I was concerned about. The next photo shows the cells close up.
4th Frame (Click on photo to enlarge to see detail)
When I look at this frame on the photograph, there appears to be tiny eggs in some of the cells. I hope you can see them--cells to the lower left. What are the two capped cells, queen or drone? Scroll down to see more photographs.
4th Frame
Once again to the lower left, I think I see eggs. Click on the image to see an enlarged version where you should be able to see what I'm talking about. I guess my camera sees better than I can because I really didn't think there were any when I looked closely.
4th Frame--Close up
The comb is built way up here, maybe 1" or more where the two capped cells are.
4th Frame--Opposite Side.
Here the opposite side shows another capped cell. There are no more capped cells on any of the other frames.
Hive Setup April 17, 2009
This photo was taken maybe 5 minutes after I put the hive back together. The bees had calmed down a lot. They were swirling all around me when I put smoke or used the brush on them.
I put another medium super on top on Monday April 13 as I learned from another beekeeper that when using mediums, you need to put two rather than one or else they get too crowded. When I just had one and then the top medium with the top feeder, bees were staying in the top, even on a cold night. The second medium has 8 frames with wired foundation but the bees haven't drawn it out yet.
History of My English Hive:
April 3: installation of package of bees and queen in plastic cage (which wasn't in the package).
April 6: empty queen cage removed
April 9: hive inspection didn't got too well since I didn't get the bees off the 2 center frames. 4 Frames were drawn out and pollen and sugar syrup were seen in cells.
4th Frame
Here you can see the cells with pollen and sugar and the two capped cells I was concerned about. The next photo shows the cells close up.
4th Frame (Click on photo to enlarge to see detail)
When I look at this frame on the photograph, there appears to be tiny eggs in some of the cells. I hope you can see them--cells to the lower left. What are the two capped cells, queen or drone? Scroll down to see more photographs.
4th Frame
Once again to the lower left, I think I see eggs. Click on the image to see an enlarged version where you should be able to see what I'm talking about. I guess my camera sees better than I can because I really didn't think there were any when I looked closely.
4th Frame--Close up
The comb is built way up here, maybe 1" or more where the two capped cells are.
4th Frame--Opposite Side.
Here the opposite side shows another capped cell. There are no more capped cells on any of the other frames.
Hive Setup April 17, 2009
This photo was taken maybe 5 minutes after I put the hive back together. The bees had calmed down a lot. They were swirling all around me when I put smoke or used the brush on them.
I put another medium super on top on Monday April 13 as I learned from another beekeeper that when using mediums, you need to put two rather than one or else they get too crowded. When I just had one and then the top medium with the top feeder, bees were staying in the top, even on a cold night. The second medium has 8 frames with wired foundation but the bees haven't drawn it out yet.
History of My English Hive:
April 3: installation of package of bees and queen in plastic cage (which wasn't in the package).
April 6: empty queen cage removed
April 9: hive inspection didn't got too well since I didn't get the bees off the 2 center frames. 4 Frames were drawn out and pollen and sugar syrup were seen in cells.
Saturday, April 11, 2009
Towhees and Waxwings
Each spring, I look forward to the return of the Eastern Towhee and Cedar Waxwing birds.
Eastern Towhee (April 9, 2009)
The Eastern Towhee is found on our land in any brushy area, especially where the multi-flora rose has taken over. This bird, seen for several weeks now, also feeds on the ground under our feeders.
Cedar Waxwing (April 11, 2009)
This past week, I have been lucky to see a flock of Cedar Waxwings drink out of our little waterfall.
I don't know how long they will stay but they brighten the day when they are around.
The birds also were drinking out of this puddle in the driveway.
Tuesday, April 7, 2009
Virginia Tech Apiaries
On Saturday, I attended the last session of my beginning beekeeping class--we were outside on a lovely sunny, cool (50ish) morning. Dr. Fell, professor of entomology at Virginia Tech, showed us how to do the hive inspection after you install a package of bees. I have numbered the photos so that others can comment and/or correct information that I've written.
1. Smoker--Dr. Fell used burlap strips in the smoker today. He said thatb eekeepers use just about anything in the smoker--pine needles, newspaper, wood chips, smoker fuel or whatever's handy (like wood chips from the pileated woodpecker for me). He said you don't want to smoke too much or have it too hot--i.e. with sparks. If it's too hot, put some grass in it to cool it down.
2. Top Feeder--Take off and smoke a little. A top feeder is good for reducing robbing and better in cold weather. This one is an inverted plastic bucket with little holes in it placed over the oval opening in the cover. A medium super is placed on top and then the telescoping roof.
3. Removing feeder and top cover. He smoked it a little as he opened the cover. The bees are clustered in the center of the hive--perhaps because it is still pretty cool (about 11:00 a.m. and the temperature is in the 50s).
4. Check for Queen Cage. He checks to see that the queen is not in there, shakes the bees out, and sets the cage aside.
5. Pull First Frame. Dr. Fell approaches from the side of the hive (never in front or you will be blocking bees' return to hive). I can't remember if he checked the first two and then this one. This frame has mostly fresh beeswax foundation but where the bees are clustered, there is new fresh comb. The first frame is laid against the hive so in case the queen is there, she can crawl back into the hive. It's better if you recognize the queen though--see next photo.
6. Queen. Try to recognize the queen first in this photo by looking where he's pointing.
Didn't spot her? If you draw a line parallel on the left side of the finger straight down, you will see a larger bee that is licked by the bees so she doesn't have any hairs on her. Note: There's a similar test on a local beekeeper Hunter Aviaries website.
7. Bur Comb with larvae. Inside some of the cells are tiny larvae--one to a cell. They are smaller but they resemble rice grains. The comb was taken out because it wasn't on the frame (mainly because a frame had to be removed to put in the queen cage). This shows the queen is laying and doing well.
8. Hold Frame to Light. I'm not sure if there's fresh comb on the foundation? but it sure is beautiful.
9. Comb on Foundation. Some of the fresh comb, clearly visible by the buildup on the foundation, is filled with pollen on the right side. I am not sure why the bees are clustered at the bottom. The fresh comb on the top of the frame should be removed because it is bur comb. Scrape it off with your handy hive tool.
10. Drone. The male drone has big eyes on top of his head and is larger than the female workers.
Dr. Fell inspected 3 hives, the last one had old foundation with comb from last year. This colony had progressed further along because the workers did not have to make comb. We saw big larvae, capped brood, and even some emerging bees who we welcomed to the bee world.
A little after noon, the temperature had warmed up to the sixties. We observed many workers returning to the hives with bright orange pollen on their legs. Dr. Fell said the pollen was from Henbit (Lamium amplexicaulbe), an alien plant in the mint family with inconspicuous purple flowers which is growing everywhere right now.
Thanks to New River Valley Beekeeping Association for conducting a great class.
Sunday, April 5, 2009
Installing My New Bees!
DAY 1 IN MY FIRST YEAR WITH HONEY BEES
On Friday, April 3, I drove down to North Carolina and picked up my package of bees at Miller Bee Supply. About 4:00 p.m. on a cloudy and rapidly cooling off afternoon, my mentor installed the bees for me (thankfully since I was a nervous wreck at that point). I watched mostly while my husband took these photos.
My mentor first opened up the hive and removed 3 frames in the middle.
He sprayed the package with sugar syrup (1:1) to keep the bees from flying and to calm them down.
He took the syrup can out, then hit the package on the ground so the bees would go down to the bottom. He then just dumped the bees in the middle of the hive, shaking the package from side to side to get most of the bees out.
He put back 2 frames, setting them down on the bees and gently pushing them aside so the frames would set down. You can see the two frames on the side are filled with fresh wired, beeswax foundation.
The queen came in a plastic cage separate from the rest of the bees. I kept her in my pocket to keep her and her attendant warm on the drive up from North Carolina. The little cork in the cage is removed to reveal a small piece of candy which the bees will eat to release the queen.
Here, my mentor is trying to hang the cage on the empty space where the missing frame is. We ended up using a toothpick to hang the cage. Notice how he isn't using a veil or gloves while I've got the bee jacket with veil on!
I was pleased with the package of bees from Miller--only a couple of bees were dead, a lot fewer than I expected. The bees and queen were raised locally and had been packaged the previous day so that might be why there was so little mortality. So, I figure I have started with 12,000 bees.
Friday night, the temperature was down in the low 40s. I went out with a flashlight after dark and saw there were still two "balls" of bees in the package outside the hive so I was worried they might freeze.
I also worried about the queen because she was just introduced that afternoon to the bees. She was in such a little cage that I worried that the bees would eat the candy quickly and kill the queen because they hadn't gotten used to her. But, I can't check on her until the 3rd or 4th day I read so I will observe the bees' behavior, perhaps that will give me clues of their acceptance of the queen .
DAY 2
Saturday morning I attended a great outdoor bee class with Dr. Fell from Virginia Tech (photos and text in this post). After some shopping (more sugar!), I checked on my bees. My husband had used the veil I bought him and had checked on them several times. He said they took awhile to stir but gradually came out. The ones in the package survived the night fine and were gradually coming out.
The bees had already drank about 1/3 of the quart of sugar syrup. Bees were out and about, some seem to be defending the hive from a few wasps. I did see one bee kill another one.
This drone, male bee, is hanging on the deer netting I am using as a temporary fence. I can tell he's a drone by his large size and the fact that his large eyes are on the top of his head (all the better to see the queen flying above.) These large bees don't do anything but mate with the queen so the female bees do all the work. Of course, my queen is already mated so he doesn't have anything to do.
DAY 3
My husband put the package on the side early this morning since all the bees have left the package.
By 11:30 a.m, lots of bees were on the front, buzzing a lot. They seemed very defensive so I did not get very close to take this picture (and with my veil on!). I hope this is normal behavior. I had also decreased the size of the entrance opening to about 2"
I put my dwarf lemon tree outside which has been blooming for over all month. Within a few minutes, a bumble bee and honey bee were on it! By the time I took this picture, only this yellow jacket? was on the fragrant blossoms.
Since I posted earlier, I observed honey bees on the wildflower toothwort in the woods as well as on a sweet cherry tree. That tree was covered with blossoms so I think they will have plenty to eat for a while.