1. Smoker--Dr. Fell used burlap strips in the smoker today. He said thatb eekeepers use just about anything in the smoker--pine needles, newspaper, wood chips, smoker fuel or whatever's handy (like wood chips from the pileated woodpecker for me). He said you don't want to smoke too much or have it too hot--i.e. with sparks. If it's too hot, put some grass in it to cool it down.

2. Top Feeder--Take off and smoke a little. A top feeder is good for reducing robbing and better in cold weather. This one is an inverted plastic bucket with little holes in it placed over the oval opening in the cover. A medium super is placed on top and then the telescoping roof.

3. Removing feeder and top cover. He smoked it a little as he opened the cover. The bees are clustered in the center of the hive--perhaps because it is still pretty cool (about 11:00 a.m. and the temperature is in the 50s).

4. Check for Queen Cage. He checks to see that the queen is not in there, shakes the bees out, and sets the cage aside.

5. Pull First Frame. Dr. Fell approaches from the side of the hive (never in front or you will be blocking bees' return to hive). I can't remember if he checked the first two and then this one. This frame has mostly fresh beeswax foundation but where the bees are clustered, there is new fresh comb. The first frame is laid against the hive so in case the queen is there, she can crawl back into the hive. It's better if you recognize the queen though--see next photo.

6. Queen. Try to recognize the queen first in this photo by looking where he's pointing.
Didn't spot her? If you draw a line parallel on the left side of the finger straight down, you will see a larger bee that is licked by the bees so she doesn't have any hairs on her. Note: There's a similar test on a local beekeeper Hunter Aviaries website.

7. Bur Comb with larvae. Inside some of the cells are tiny larvae--one to a cell. They are smaller but they resemble rice grains. The comb was taken out because it wasn't on the frame (mainly because a frame had to be removed to put in the queen cage). This shows the queen is laying and doing well.

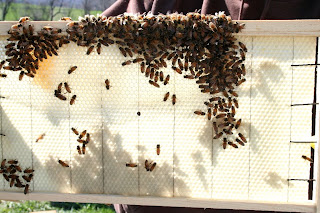
8. Hold Frame to Light. I'm not sure if there's fresh comb on the foundation? but it sure is beautiful.

9. Comb on Foundation. Some of the fresh comb, clearly visible by the buildup on the foundation, is filled with pollen on the right side. I am not sure why the bees are clustered at the bottom. The fresh comb on the top of the frame should be removed because it is bur comb. Scrape it off with your handy hive tool.

10. Drone. The male drone has big eyes on top of his head and is larger than the female workers.
Dr. Fell inspected 3 hives, the last one had old foundation with comb from last year. This colony had progressed further along because the workers did not have to make comb. We saw big larvae, capped brood, and even some emerging bees who we welcomed to the bee world.
A little after noon, the temperature had warmed up to the sixties. We observed many workers returning to the hives with bright orange pollen on their legs. Dr. Fell said the pollen was from Henbit (Lamium amplexicaulbe), an alien plant in the mint family with inconspicuous purple flowers which is growing everywhere right now.
Thanks to New River Valley Beekeeping Association for conducting a great class.
This is so interesting. How wonderful that you are sharing this knowledge and experience with us. Have you done your own hive inspection yet?
ReplyDeleteNCmountainwoman--I thought about starting a new blog but then I didn't think I wanted to keep that up. So, I keep a paper journal and will post only the photos that others (including my fellow beekeepers) might want to see. Thanks for your interest.
ReplyDeleteLooks like you had a buzz of a good time!
ReplyDeleteso interesting, great picture set for the whole process :) I use honey with my tea
ReplyDeletemon@rch--Ha, guess I'm not going to hear the end of bee puns! But, I did have a "buzz" of a good time.
ReplyDeleteNabeel--I like honey too in cooking and on biscuits too!
ReplyDeleteThis is very interesting stuff..I think you should keep posting your bee keeping adventures here as well.
ReplyDeleteGood luck with your new venture.